
SARTrack Preparation,
Deployment and Operations
This
document covers issues relating to the use of the SARTrack system
during an Search and Rescue Operation (SAROP).
It also talks about Network, Internet access and Power issues at remote
locations.
Version 0.4, 30 May 2013. Work in progress, please supply feedback to: info (at) sartrack.co.nz
Preparation
SARTrack Computers
Callsigns and Passcodes
Maps
Network
Internet access at remote locations
Deployment
Setting up
The Radio operator
Internet access
GPS radio tracking
Initializing GPS units
Operations
The SARTrack network
The Radio operator
Using SARTrack
How to use the Operations Log
Additional Information
The SARTrack Database system
Power considerations at remote locations
Before
any SAR Operation (SAROP), you must make sure that all computers,
network equipment, trackers, radio equipment etc. are all properly set
up and ready for deployment. This chapter will concentrate on all
SARTrack related issues, but also on Networking and Power requirements.
SARTrack computers.
All
SARTrack computers used during a SAROP must be using the SAME version.
So make sure that all your laptops are updated all the time.
I strongly suggest that
you download the latest SARTrack install package from the server ( http://www.sartrack.nz/Downloads.html
) before a SAROP, and copy it on a
USB stick to be used on-site to update any laptops which have an older
version (or to install new ones).
Also, download any extra OSM Maps you
use from the OSM Example Maps directory on the server, so you can copy
these onto other
laptops as well (see the README file in this directory on how to do
this)
There
must be one dedicated SARTrack laptop
available for a SAROP an all times.
This laptop will act (and must be
set up) as the 'Server'
and be the primary Operations Log database. This
means, it should be about the first item to get switched on when
arriving at location, ready to accept the first operational Log
entries, even before the local LAN or WIFI is set up.
Make sure this
laptop always has the SARTrack 'local server' running, so all other
laptops
can connect to it and share all data. You can find this in
Setup/General/Local_Server.
This dedicated laptop
should also have your unique GROUP
ID
set up (in Setup/SAR). Every SAR organisation in the world should have
a unique Group ID selected, which is a number between 100 and 25600.
This ID is used to link all computers in your organization.
Once you have selected your initial random Group ID, it should never be
changed.
New Zealand users will be allocated a GroupID by SARTrack Limited.
All SARTrack computers used within your group, must be set
up with the same
Group ID.
Callsigns and Passcodes.
Every
SARTrack laptop needs its own unique Callsign-SSID. If
Amateur Radio callsigns are used, you can use a single Callsign for all
SARTrack computers, but with sepparate SSID's: -1 to -15.
Maps.
To be able to work off-line (without access to the Internet) and
still be able to use the OSM (topographical and satellite) maps, they
should first be bulk-downloaded, for the area's you normally work in,
and for each Map separately. This can be done in the OSM Map window, by
selecting 'Bulk download'.
Please read the Help on
this function.
As bulk-download is a
real burden on the OSM Servers, please do this one time only, and then copy the OSM
maps to all other computers used in the SAROP.
All OSM map tiles and
databases are kept in: ..\My Documents\SARTrack\OSMMAPS\
Simply
copy the entire directory tree OSMMAPS onto a USB stick, and then Paste
it (Merge it) on all other SARTrack computers used in the SAROP. If
required, you can do this on-site. Make sure to
close the SARTrack program before you do this!
If there where originally Map Tiles on the target computer which you still would like to access, you need to rebuild the Database on the target computer. Else you will have access to the newly copied Map's only.
Network.
The
basic principle of the SARTrack system during a SAROP is the use of a
local LAN/WIFI network, so many SARTrack laptops can be connected to
each other and share all data: The Operations Log, Messaging, Tracking of
teams, Objects and Search Areas on the Map, etc.
This
makes it possible to for example, have one laptop show the Map, another
the Operations Log, another the Log TimeLine, etc. An IT person can sit in the
Operations area communicating with the Radio operator via the Operations Log,
while
the Operations Manager can use another laptop to view the same Operations Log
(in Sequential, TimeLine or Bulletin board mode).
Also, it enables you
to share all
other non-SARTrack PC data between computers, and to connect to a
printer.
The simplest way is
to use a WIFI Access Point (AP), which can be purchased cheap
anywhere.
However, please do make sure that this AP works properly without it
being connected to the Internet (via the WAN port). That is, it should
work as a local LAN even if the WAN port is NOT connected. Some AP's
will not work properly in that situation.
I strongly suggest that
a
dedicated AP is used.
Buy
an AP with an external antenna, or one which is documented to be for
'long range'. Many
new AP's are designed for very short range only and use an internal
antenna.
This AP should be set
up either with NO encryption enabled, or with WPA2 encryption, and a password
which is taped to the AP box itself! It is no use arriving with a AP
when nobody knows how to log on to it.
Also tape the IP
address, Web Login and Password to the box, so you can get in to make
changes.
The default settings in
the AP should be okay, just give it a SSID (name) which makes sense,
like your SAR group name. Also, set the WIFI radio Channel Number to
11, which is least likely to be interfered with.
If at all possible, do not let other SAR members bring
their own AP's and use them at the same
location, unless they are guaranteed set up on a different
channel. Interference between WIFI AP's can cause major
packet-loss problems and cause SARTrack computers to lose individual
data.
And don't forget, there
is no communication possible between
laptops on different AP's, including access to the printer, and
possible file transfer (of images, documents etc.)
It is
extremely important that the
AP always has power, even when the Generator suddenly stops!
I cannot stress this enough.
When the
network fails, all connections between
the computers will be down, and SARTrack clients will not be able to function. The best way to
make sure
this never happens, it to use an AP which can work on 12 volt. You can
see this on the power supply which came with it. If it is a 12 volt
unit, you can connect it directly to a car battery (or any small
portable 12 volt lead-acid battery) by making a special cable for this
purpose.
When you have the AP in an
Operations caravan or vehicle, make a permanent connection to the 12
volt system, instead of relying on an external Generator power source.
Alternatively, use a large Inverter running on car batteries for all
critical equipment which cannot run directly on 12 volt. More about
remote Power issues.
Most
AP's also have several LAN ports at the back. It is not a bad idea to
have the 'Server' laptop connect to the AP by cable, instead of the
wireless connection, to increase reliability. So, bring some
long network cables, and duct tape to secure them.
Internet access at remote locations.
It is of great use when you can have Internet access at the remote
Operations location.
There are two
possibilities:
- Satellite access.
- Mobile Broadband
(GSM) access
When
a two-way Satellite connection is used, we can assume that call
computers on the LAN/WIFI have full two-way Internet access. The
Satellite access system itself falls outside the scope of this
document. However, please apply all recommendations regarding the AP as
noted above.
For Mobile Broadband
(GSM) access, there are USB dongles
available from your local network provider. Buy a long USB extension
cable, possibly 20 meters. These cables have internal amplifiers at
various positions. Make sure to test the USB Dongle and cable
combination to make sure it works properly.
The combination of a
Broadband USB dongle and long extension cable makes it possible to
locate the dongle at a high location and get Internet access which
would not be possible at ground level, or inside a building. (bring
some small plastic bags and PVC tape to cover the dongle from rain)
(There
are also WIFI units available which have build-in Broadband. These make
it a lot easier to connect all SARTrack PC's to the Internet, not only
for the access to the Internet Database Server, but also to be able to
download OSM Maps from OSM servers in the world.)
The
SARTrack computer which has an Internet dongle plugged in should be the Local Database Server.
It
is possible to set up the computer with the Broadband dongle to share
the Internet access with all other computers on the local LAN.
This
is possible with Windows 7 or higher, but my own experience has shown
that it is extremely difficult to set up, and is unreliable under
Windows
7. Unless some special software tool is used designed for the
purpose of sharing the Internet access with other computers, I cannot
recommend it.
Note that the local
SARTrack APRS network does not require this
for Internet access, except that it is not possible for all other local
SARTrack computers to download more OSM Map tiles.
Setting up.
So, a Search and Rescue Operation (SAROP) has initiated at a remote
location in the bush and/or mountains.
Operations
must be set up in a local building, hut or tent. If you are lucky, you
can set up your mobile SAR Operations vehicle (a caravan
or RV).
The
latter would make life much easier, as you can have immediate power and
the computers, LAN and radio equipment are available in the vehicle.
This
document assumes the 'worst case' scenario where you arrive
at a
location with only a hut or tent, and no electricity.
Obviously, depending on
weather situation, you need to get under a roof, and set up some tables
and chairs to work on.
The
next step is to start up the primary Laptop, which will have the
SARTrack Server and Operations Log on it. You can now start a new SAR
Operation on this laptop, using a new Name for the SAROP. In the
Operations Log window, select "New Active Log". Enter a Name for the
current
SAROP. The previous Log will be
saved and the new one starts with a clean slate.
You can now enter your
first Log entry, indicating the start of the SAROP.
The
next step is setting up the power at the site. As discussed in the
'Preparation' chapter, make sure that all critical equipment like the
local LAN/WIFI Access Point (AP) are running on a power source which is
not interrupted when the local generator stops.
Set
up the local AP at such a location that the best coverage is achieved.
Don't forget: It is just a mini radio repeater. It needs to be at a
location where all WIFI enabled computers can connect to it without
interference. Don't put it inside a metal cage (like a caravan) when
you need access outside. At the least, put it in front of a window in
the direction where outside Laptops are going to be located.
Now
the Local Area Network (LAN) is online, any other laptops can connect
to the AP. All SARTrack computers (except the Server) should
be
set up for automatic connection. In
'Connection Setup/Database', select 'Automatic" and click OK. SARTrack should now
automatically connect to the Server (as long as
they are on the same LAN).
The "Database" label on
the Main Menu should turn green after a short while.
If it won't connect,
try Manual access.
From this moment on,
all connected SARTrack share the same data.
The Radio operator.
SARTrack
has a special LOG window for the Radio Operator. This 'RadioOps' window
is a simplified version of the standard Log window, and only contains
these fields which are required to transfer information between the
Teams in the field, and the SARTrack computers located in the
Operations area. It is assumed that the Radio Operator is not
located in the same area as Operations, but in another area. Because of
this, and the importance of the link between the Radio Operator and the
Operations area, it is critical that the Network link is without
interruptions. It must be checked that WIFI access at the Radio
operator's computer is strong and reliable. If this is not the case, a
long network cable should be used to connect this computer to the WIFI
Access Point direct.
Internet access.
As mentioned in chapter Preparations, Internet access is a huge help if
it can be established.
If you have access to a
two-way Satellite Internet connection, this should be connected to the same
Local Area Network (LAN) as the SARTrack computers. Possibly, the
satellite equipment comes with its own LAN/WIFI system, in which case all computers should either use that LAN, or the satellite LAN must
be connected to the other LAN/WIFI AP by cable, probably to the WAN port. This falls outside the
scope of this document, and should have been tried and tested before
any SAROP.
If
there is any chance that Broadband phone coverage could be available,
use the 20 meter USB extension cable and Broadband dongle (mentioned in
Preparation) to try to connect to your local service provider, or any WIFI unit with build-in Broadband.
If using a dongle, locate it (in a small plastic bag against the rain) at the highest
point possible. If a tree is available, use a long piece of string to
hang it in the top.
Else, a long fishing
rod can be used as a mast. In any case, get it outside the building and
as high as possible.
If
an Internet connection has been established, on the SARTrack
Local Database Server computer which has the dongle plugged in, connect the Local Server to the Internet Master Server.
The 'Remote' panel on the Local Database Server should turn green. From this moment, all local SARTrack clients have APRS access to Master Server, and any
SARTrack computers elsewhere (and which are part of your Local
Group) will have full access to the SAROP (Operations Log, Messages, Tracking,
Objects, Search Areas, etc.)
GPS Radio Tracking.
If
you are going to use live tracking of Radio Trackers, you must connect any SARTrack Client
to an APRS Modem (TNC) or one of the supported Tracking Radios, using a USB cable.
For APRS Live tracking, we recommend the TNC-X radio modem.
Connect
the TNC or tracking Radio to any of the SARTrack computers. In both
cases, you MUST use an
external antenna, outside and as high as possible.
In
SARTrack Connection Setup, select the required interface, and enter the appropriate data. Make
sure the COM port is correct, and not conflicting with any other COM
ports on the computer. You can find (and change) the COM port used by
the USB device in Windows Control Panel/Hardware_and_Sound/Device
Manager. In the Device Manager/Ports, you should see your USB
Device used by the TNC or Radio. By going into on
Properties/Port_Settings/Advanced, you can change the COMPort if
required. Afterwards, select the same COMPort in SARTrack.
Initializing
all GPS units.
GPS devices must first synchronize
with the GPS satellites,
before they can be used.
The way GPS works, is that the GPS unit must receive every available
satellite un-interrupted
for at least 30 seconds. Any interruption during this synchronisation
process,
and it has to start again. The GPS will not be able to report
any position, until it has done this for at least 2 satellites, but you
should try to get 8+ satellites working.
Because of this, it is
very important that you activate all GPS devices (APRS Trackers, GPS
enabled Radios, and Smartphone Trackers), and put them outside with a
clear view of the sky for at least 5 minutes.
Once the GPS unit has
synchronized itself with all available satellites, it will then keep
working even when short interruptions occur when your Teams disappear
into the bush or steep gorges.
If a GPS Tracker is simply
switched on, put in a backpack, and then immediately disappears into
the bush, due to the continuous interruptions caused by tree's etc.,
the GPS may never initialize, and may not work at all.
The SARTrack network.
The
power of SARTrack is in part the fact that all SARTrack computers share
the same data on the Local Area Network (LAN), and when Internet access
is available, also with SARTrack computers in the outside world (central Operations Centres, external advisors, etc.)
Locally,
this means that SARTrack laptops can be used as if they where multiple
monitors, each showing a different window. For example, one laptop
shows the Map with all Tracks, locations, Objects and Search Areas,
another shows the Operations TimeLine, another the Log Status Bulletin
board, while an IT operator works on his/her laptop adding data to the
Operations Log and entering Objects on the Map which will update all
other
computers.
While in the meantime, the Radio Operator, using the
special RadioOps Log window, relays all communication between the Teams
in the field, and the Operations room.
And, if Internet is
available, external advisors or central Operations Centres can
participate in the SAROP in the same way as if they where on-site.
The Radio operator.
SARTrack
has a special LOG window for the Radio Operator. This 'RadioOps' window
is a simplified version of the standard Log window, and only contains
these fields which are required to transfer information between the
Teams in the field, and the SARTrack computers located in the
Operations area.
The
time of people running between the Radio area and the Operations area
with hand-scribbled pieces of paper should now be long gone!
SARTrack's Operations Log system is designed not only to deal with all standard
Operations log entries, but also to supply a reliable, and documented
link between the Radio operator and the Operations team.
The prefered way is this:
The
Radio Operator should if possible have a sepparate person sitting next
to him/her entering all incoming Radio traffic into the Log. The Radio
Operator can see the laptop, and transmit all messages from
Operations to
any Team by reading it directly from the screen.
If
it is not possible to have a second person helping, the Operator can
enter all incoming data him/herself, but it is not really recommended.
Note that the person entering data into the computer only needs good
typing skills. Any young kid could do it...
On the
Operations side, you need one person who does nothing else than
entering data into the SARTrack network.
This person should be dedicated to just that job.
The Operations
Managers should NOT have to enter all their own data.
They
should Manage, and use their own SARTrack laptop(s) to view all
available data, on the Map, TimeLine and Bulletin Status board.
Once
again, the person entering all data into the Log only needs good
typing skills, and does not have to be a SAR specialist.
The power of above system is that:
-
Operations managers can concentrate on their job, having full access to
all available information, the moment it comes in (including radio
messages from teams in the field: They see them as soon as it is
entered at RadioOps).
-
All information is permanently Logged. This includes all Radio traffic,
tracking, entering of Objects on the screen, Messages send and
received, etc. This Log will tell the story of the entire Operation,
and can be used afterwards by Police and Coroner if required.
Using
SARTrack.
This
document is not a complete Help file on how to use SARTrack. Please use
the SARTrack Manual available on the website for more details.
The Basics:
- All Map access should be done with an External Mouse,
not with the Laptop pad. You can drag the Map with the left mouse
button, and Zoom
with the mouse wheel.
Right-click accesses the popup menu.
From
the Map window, Search Areas can be drawn. They are limited
to 26
points, due to the fact they must be transmitted to all other SARTrack
computers, but you can string them together.
Objects (Map Markers) can be added on the Map. They could be positions
of Teams (manual entry), items found by the teams, etc.
Live
Tracking of Teams will be displayed on the Map. Tactical callsigns and
Track Color can be changed by Editing the tracker. This information
will be transmitted to all other SARTrack stations connected at that
time.
If Teams positions are added manually (and this is not
recommended, they should have a GPS Tracking device) they will be added
as an Object with a Track.
Messages:
Messages
can be send to any Station or Message enabled Radio Tracker. This will open a
new Chat Window for the conversation with this station. This is a very
usefull feature to communicate between SARTrack computers at remote
locations, to discuss issues.
Group Messages can be send as well.
When
you select "Local SAR Group" in the Messages window, a Group message
will be send to ALL SARTrack computers connected at that time. The Chat
Window which will be opened on all computers will enable you to
communicate information intended for the whole Group.
The Operations Log.
This is a powerfull feature of SARTrack.
It is used to:
- Communicate between the Radio Operator and the Operations Team.
- Log all events during the SAROP.
- Keep track of the Status of Teams in the field, and other issues.
- Enter all comments and ideas from the Operations team.
- Entering Weather and Tide information.
- Automatically log: Entering of Objects and Search Areas, All Messages
being send and received.
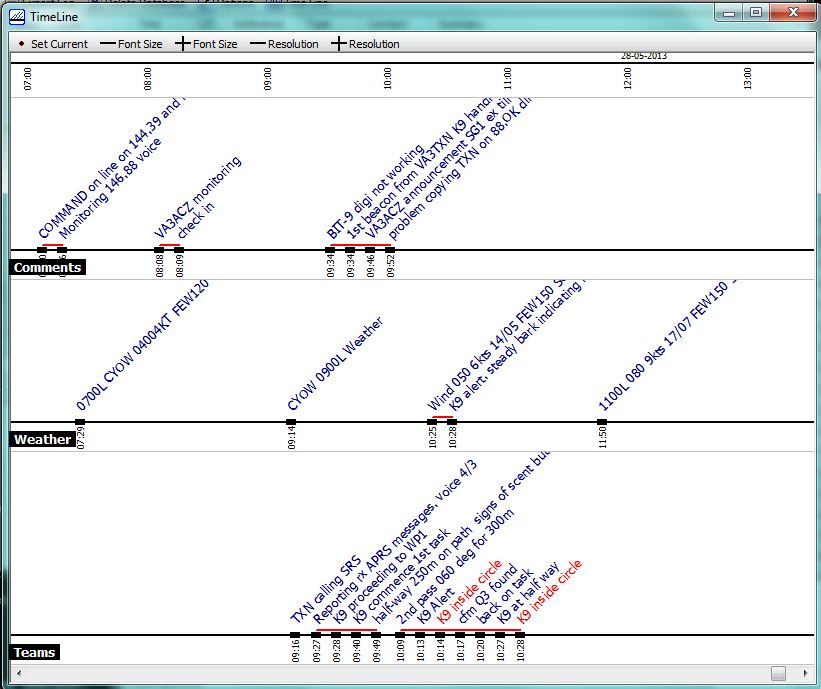
The Log can be displayed in three ways.
-
The Standard sequentional Log window. All Log entries are
shown
sorted by time. New Log entries can be made from this window.
- The
Log TimeLine window. This 'white board' window shows selected Log entries
on several Time Lines, like Teams, Clues, Weather and Map Markers. New
TimeLines can be added, and the size and order in which they appear can
be changed.
- The Log Status window. This windows shows the
latest entry by "Reference" field in the Log. When a new Log entry
appears for a certain "reference" (like 'Team 1' or 'Team 1 Status')
this entry will replace the previous entry on the window.
The Operations Log (Sequential)

The Log TimeLine window.
How to use the Log.
There are two versions of the Operations Log window: The Standard version, and the Radio Operator version.
The latter is a simplified window, with only those fields included the which the Radio Operator needs.
The Standard Version is the one which should be used by all other Operations people.
By
clicking on the New Log Entry button, a Log Entry form will appear.
There are several (pull down) fields which are required to be selected.
- FROM/TO: In which direction does this Entry go?
This relates to the following Reference field, for example:
FROM: (reference) "Team 1"
TO: (reference) "Team 1"
FROM: (reference) "Operations"
TO: (reference) "Operations", etc.
- Reference:
The
reference field following the FROM/TO field is a critical field, as it
links the LOG data to Teams on the field, and any other items in the
operation. The pull-down list will automatically be extended when new
entries are added, but also when Tactical Callsigns are received from
Trackers in the field.
The Reference will be used to generate the Status window, where the last entry relating to the Reference will be displayed.
- Log Type:
The Log Type field is used to select the relevant Time Line for this Log entry. The default is "Standard" which will not show on the Time Line window. Some other available entries are: Teams, Clues, Comments, Map Markers, etc.
However,
these are user configurable. You can remove Time Lines, and add your
own. Only the "Map Markers" Time Line cannot be removed, as this is the
default location for all Objects (Markers) which are added to the Map.
It
is possible to change the Log Type (and therefore the Time Line on
which it appears) afterwards, by right-clicking on the Log entry, and
selecting "Transfer to other TimeLine".
- Priority:
This will mark the Log entry as a Priority by displaying it in a red color.
- Enter Coords:
When
a Team reports GPS coordinates, it can directly be added to the
Map from the Log entry window. This should be used with extreme
caution, as an incorrect entry will cause the resulting Map Marker to
be displayed at the wrong location on the Map, and if a Track is used
for this Marker, moving the Marker afterwards to the right location
will still leave an incorrect track on the map.
- Body and Summary:
The
Summary is displayed on all three Log windows (Log, TimeLine and
Status). The full multi-line Body is displayed when the Log entry is
selected.
- When entering text in the Body, but not in the Summary, the first line of the Body is copied to the Summary.
- When entering text in the Summary, but not in the Body, the Summary is copied into the Body.
Otherwise, the Summary and Body are saved as entered.
Please read the Manual for all available options.
Power considerations at
remote locations.
Power at remote locations is always provided by portable generators.
The
problem with this is, that they need to be refuelled on a regular
basis, and while this happens or when it runs out, the power will fail.
For some equipment this it not an issue, for example all Laptops will
keep running on their own batteries for some time.
However, printers, video projectors and LAN equipment (WIFI and
routers/switches) do not have a build-in battery backup.
The
way around this, is to run some of them directly on car batteries if
they are capable of operating on 12 volt, or to connect them to a large
inverter which itself is connected to a large 12 volt car battery.
What you should
NEVER do, is to try and connect an UPS (Un-interruptible
Power Supply) unit to a
portable generator!
While
a UPS is in fact an Inverter connected to a (internal) 12 volt battery
as mentioned above, it is designed to detect any fluctuations in
voltage and/or frequency of the incoming power.
When connected to
a small portable generator, any fluctuation will cause the UPS to
switch all its connected equipment from generator power to the internal
inverter. At this point, the generator will suddenly be unloaded and
after a wild swing, will stabilize. The UPS will detect this, and
reconnect all equipment back to the generator. Which will suddenly get
a full load, drop in voltage and frequency, and the UPS will
immediately switch back to internal power.
This may happen several times a second, and the internal relays will be
rattling like castanets.
I have seen a large UPS burn out during a SAREX due to this, and
the entire area was without power.
So, the best option is to use a large inverter (2 Kw or more) connect
this to a (set of) car batteries, and use a large
battery charger to keep the batteries charged during operation.
This
may seem a bit of work, but it gives you a stable (non-fluctuating)
230V (or 110V) power source, which will never fail, even when the
generator goes off-line for refuelling.
NO
power = NO Network, NO communications, NO SAROP!
----